本文
YAML 是一種用於數據序列化的語言,設計初衷是讓人類能夠直接讀寫。
它是 JSON 的一個嚴格超集,具有類似 Python 的有意義的換行和縮排。
不同的是,YAML 不允許使用文字 tab 字符進行縮排,而需要使用空格進行縮排。
範例檔
1 | --- # 文件開始 |
參考
(fin)
YAML 是一種用於數據序列化的語言,設計初衷是讓人類能夠直接讀寫。
它是 JSON 的一個嚴格超集,具有類似 Python 的有意義的換行和縮排。
不同的是,YAML 不允許使用文字 tab 字符進行縮排,而需要使用空格進行縮排。
1 | --- # 文件開始 |
(fin)
Load Balancing 的主要目的是確保系統的可靠性、高可用性和性能。
透過平均分發網絡流量到多個伺服器,我們可以防止單一伺服器的過度負載,從而減少系統故障的風險。
此外,使用負載平衡器還可以提供可擴展性,使我們能夠根據流量需求自動調整伺服器的數量,確保系統在高負載情況下仍能保持良好的性能。
但是,我希望使用負載平衡器來達到降低對外 IP 地址和憑證費用的目的,以降低維運成本。
透過只需為負載平衡器配置一個對外 IP 地址和憑證,而不需要為背後的多個伺服器分別配置對外 IP 地址和憑證。
現在的公司,在舊架構上開了多台的 VM,並且都提供了對外的 IP address 與憑証,
對我來說,不僅實際上較為省錢,管理上也會更好理解。
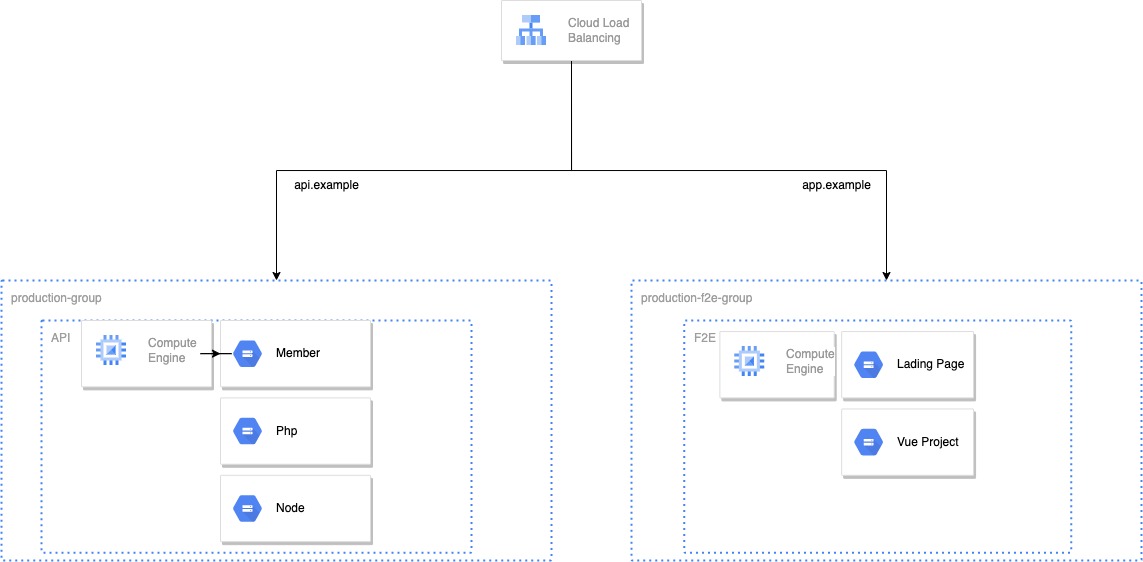
如圖所示,我有兩台 VM , 一台用來放置 api 相關的服務,比如說,member 會員系統,
另外還有一些整合性的服務,分別使用 Php 與 Nodejs 開發,簡單想成 api Server 就好,
實際上在 VM 當中有掛載 Nginx 系統來管理其相對應的路由設定。
另一台 VM 也不單純,儘管他只提供靜態的 Landing Page 網頁與 Vue 建置 SPA 網站,
但在可預知的未來他會 Host 更多的靜態網站。
也許可以考慮其它的 GCP 解決方案,ex:App Engine、Cloud Storage;
但總之目前就是這樣的架構,而我主要目的是不希望花太多時間處理憑証與對外的固定 IP 的問題,
所以本篇將會以這樣的架構進行建置 Load Balancer
本案中,我們會有兩個 domain 分代表前後端
api.example與app.example,
host 設定為 domain,而路徑設定為/*,後端指向對應的 group ,如下api.example|/*|prod-api-groupapp.example|/*|prod-f2e-group
整個建置流程與 SSL 憑証、IP Address、backend-services、instance-groups 等服務相關
雖然在建立 LB 的過程中就會建立憑証(certificate),
但有些情況可以使用 gcloud 指令作細節的控管
比如說,列出 SSL 憑證:
1 | gcloud compute ssl-certificates list |
更多資訊請執行以下語法,
1 | gcloud compute addresses --help |
同理,可以用類似的語法查詢其它的資源
1 | gcloud compute instance-groups --help |
1 | gcloud compute addresses --help |
1 | gcloud compute backend-services --help |
ChatGpt 有時會亂掰一些指令出來,我沒有一一實際執行過的這裡就不提供了。
測試負載平衡器:在將負載平衡器放入實際生產環境之前,您應該進行測試,確保負載平衡器正確運作並且可以處理預期的流量。
監控和調整:一旦負載平衡器正式運行,您應該定期監控其性能和健康狀況,並根據需求進行必要的調整和優化。
如果想要從特定的 GCP VM 下載檔案到本地端可以用以下指令
1 | gcloud compute scp {your-db-name}:/{some-service}.log ~ |
(fin)
請參考前篇,
我們已經建立兩台 VM,
本篇將介紹 Firewall 的相關設定,
架構如下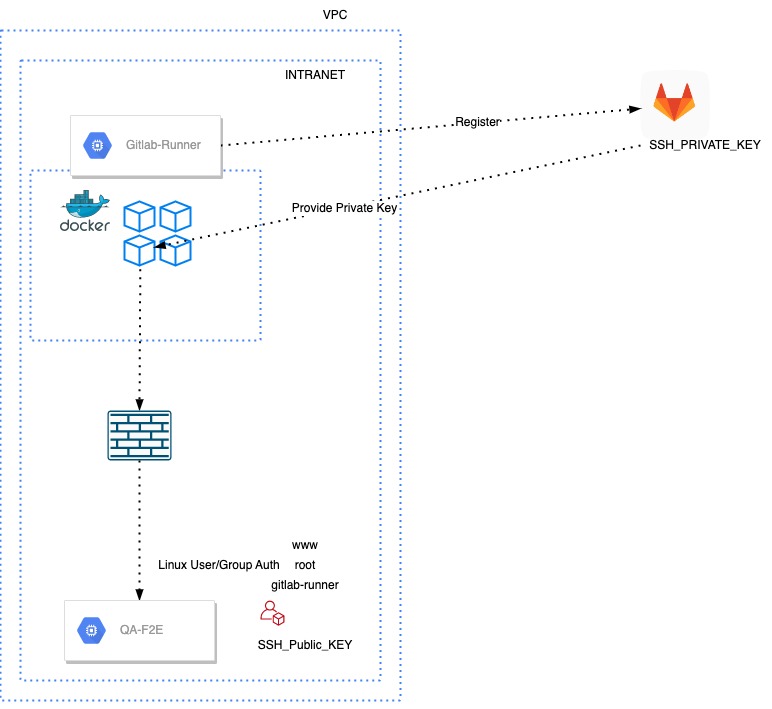
為了建立我們的 QA 測試環境,我們需要在 Google Cloud Platform (GCP) 上進行一些設定。
由於 QA 環境只能允許公司內部網路的存取,但我們又需要使用 Google 登入功能,這就需要綁定真實的 Domain 與對外 IP。
為了確保安全性,我們還需要設定防火牆,只允許經過公司路由的流量進入 QA 環境,以限制訪問權限。
這樣可以確保只有公司內部的流量可以訪問 QA 環境,保證資料的安全。
這個設定可以讓我們擁有一個安全、受控的 QA 環境,並且能夠順利使用 Google 登入功能,提供更好的使用體驗。
登入至 GCP > VPC 網路防火牆設定頁面。在此頁面中,您可以新增防火牆規則。
接著,建立名稱為 “block-all” 的防火牆規則,並將優先級設定為 1000,以阻擋所有流量。
設定來源 IP 範圍為 0.0.0.0/0,並將允許的協定設定為 “deny”,以阻擋所有網路流量。
同時,建立名稱為 “allow-my-company” 的防火牆規則,並將優先級設定為 999,以允許公司內部網路的流量通過。
設定來源 IP 範圍為公司內部網路的 IP 範圍,並設定允許的協定包括 HTTP(80)、HTTPS(443)、SSH(22)和 ICMP,以便允許相應的流量通過。
最後,在創建防火牆規則時,務必勾選 “套用於標籤” 選項,並選擇要套用防火牆規則的 VM 的標籤。
確認防火牆規則的設定與標籤套用正確無誤後,點選 “建立” 來創建防火牆規則。
確保您的 VM 上都已經套用了 “block-all” 和 “allow-my-company” 這兩個防火牆規則的 tag,以確保該 VM 可以通過防火牆規則的設定進行存取。
最後,確認這兩個防火牆規則都已保存並生效,以確保 QA 環境只能通過公司內部網路存取,並且仍然可以使用 Google 登入功能。
建立 GCP 防火牆規則並套用 VM 標籤,確保 QA 環境的存取限制符合公司的需求。
(fin)
請參考前篇,我們將建立兩台 VM,
一台作為 CI/CD 用的 Gitlab Runner,另一台作為 Web Server,
本篇將介紹 Gitlab Runner 的相關設定,
架構如下
建立 GCP VM 步驟如下:
安裝 GitLab Runner, 參考 GitLab Runner 官方文件 上的指南進行安裝。
將該 Runner 註冊到您的 GitLab 項目中。注意 Runner 有 Group/Project/Shared 之分。
我們選擇 Group Runner, 請安裝 CLI
1 | # 添加 Gitlab Runner 存儲庫的 GPG 金鑰 |
執行註冊
1 | # 註冊 Gitlab Runner,請按照提示輸入 Gitlab 的 URL 和 Runner 的註冊 token |
您可以在 GitLab 網站的項目設定中找到 Runner 註冊的相關資訊,並按照指南進行註冊。
下面是 2023 年的實作記錄,如果你有遇到任何狀況,再查閱 Gitlab 相關文件.
註: 需注意 Gitlab 的官方文章指出,未來將計劃棄用 Gitlab Register Token 的方式
The new registration process is expected to become available in %16.0,
and the legacy registration process will be available side-by-side
for a few milestones before the being sunset through a feature flag.
Removal is planned for %17.0.請參考
首先,你必須是 Group Owner。
接下來在 Group > CI/CD > Register a group runner > Registration token > 👁️ 取得 Token
執行 gitlab-runner register, 依提示輸入
其它參數請參考
執行命令後,應該可以在 Group > CI/CD > Runner 看到它,記得要啟動才會開始作業
我們現在完成了 Gitlab-Runner,如果你也完成了你的服務伺服器設定,回頭看一下架構圖,
可以注意到,我們會透過 docker container 執行我們的 CI/CD 工作,
並且存取 GCP 的資源,在我們的例子中是使用 VM ,讓我們先忽略防火牆與使用者帳號的相關設定,
單純的連線機器實體,我會採用 SSH 的連線方式。
在一般的情況,我們會在 Client 端機器上生成 Private Key 與 Public Key,並且將 Public Key 放到 Server 端(服務伺服器)上,
不過在使用 docker container 的情況下,我們的 Client 端可以想像成是一個拋棄式的機器,
每次都建立新的 Private/Public Key 會讓 Server 端記錄著一大堆沒有用的 Public Key,
所以我們先建立好一組 Key,然後透過 Gitlab Variable 的機制傳遞到 Docker Container。
在此例中我,我用「File」儲存 Private Key。
未來可能會再評估一下資安風險。
請參考前篇,我們將建立兩台 VM,
一台作為 CI/CD 用的 Gitlab Runner,另一台作為 Web Server,
本篇將介紹 Web Server 的相關設定,
架構如下
建立 GCP VM 步驟如下:
Web Server 我們建置得很簡單,
使用 Vue 建立的靜態網站,並且由 Nginx 來 host 它
1 | sudo apt update |
設定 Nginx:預設的 Nginx 設定檔通常位於 /etc/nginx/nginx.conf.。
可以編輯此設定檔,設定 Nginx 如何處理 Vue 的靜態檔案。
以下是一個範例設定檔:
1 | server { |
在建立測試環境的 Web Server 時,需設定 public IP 以對外提供服務,
但同時需要建立防火牆以保障安全性。其他如 DNS、憑證、防火牆等設定,之後再補充。
將 Vue 應用程式編譯成靜態檔案:在 Vue 應用程式的專案目錄中,可以使用以下命令編譯 Vue 應用程式成靜態檔案:
1 | npm run generate |
編譯完成後,靜態檔案會生成在 ./output 目錄下。
將編譯完成的靜態檔案放置到 Nginx 的目錄,
重新啟動 Nginx 即完成部署,如果有設定 Hot Reload 則不需要重新啟動
現在可以透過瀏覽器來測試 Vue 的靜態網站是否正常運作。
重啟 nginx
1 | systemctl restart nginx |
Nginx hot reload
1 | nginx -s start |
(fin)
在一個團隊合作開發的場景中,多個開發人員可能同時對同一個程式碼庫進行更改,
而 CI/CD 可以自動進行建置、測試和部署,以確保程式碼的品質和穩定性。
此外,CI/CD 還可以幫助提高交付速度,減少錯誤,並支持快速反饋和迭代開發。
在這個背景下,選擇 GitLab CI/CD 與 Google Cloud Platform(GCP)作為 CI/CD 解決方案有幾個優點。
首先,GitLab CI/CD 提供了完整的 CI/CD 功能,包括強大的持續整合和持續部署工具,能夠無縫集成到 GitLab 的版本控制平台中,
方便團隊進行版本控制、自動建置和測試,並實現自動化的程式碼部署。
其次,GCP 是一個廣泛使用的雲端平台,提供了豐富的計算、儲存、網路和資料庫等服務,
方便團隊在雲端環境中進行應用程式部署和運行,並且與 GitLab CI/CD 有良好的整合性,可以輕鬆設定和管理 CI/CD 流程。
替代方案:若不選擇 GitLab CI/CD 與 GCP,團隊可能需要考慮其他 CI/CD 工具和雲端平台的組合。
例如,替代 GitLab 的版本控制工具可以是 GitHub、Bitbucket 等;替代 GCP 的雲端平台可以是 AWS、Azure 等。
在我們的架構之中,我們使用 Docker 作為 GitLab Runner 的執行環境,
並在 GCP 上使用虛擬機器(VM)作為運行應用程式(web server)部署環境。
透過 GitLab Runner 和 Docker,我們能夠自動執行 CI/CD 任務,
並根據需要動態調整運行環境,確保我們的應用程式在開發和部署過程中保持高品質和穩定性。
如下圖。
接下來我將進行以下動作:
以上的步驟將協助我們建立基於 Gitlab 與 GCP 的 CI/CD 流程,並以此提供程式開發的品質和穩定性。
(fin)
工作上有開發前端專案的需求,主流使用 JavaScript。
而聽說了一些強型別語言的優點,加上我有開發 C# 的經驗,我常常改用 TypeScript,
但實際上確常常覺得反而更笨重了,覺得開發上不太順暢。
相依性的管理十分麻煩,常常有新版的模組更新,但其相依的模組卻尚未更新。
運氣好等幾周就會有更新,運氣不好是模組的開發者已經不在維護,目前我的處理方式是使用 ncu ,
但也有其極限,而在其上花費的大量時間,反而拖累開發的速度。
另一個麻煩的點是使用 TypeScript ,雖然我有 C# 的經驗,也熟悉 JavaScript,
但是常常覺得開發仍然不順,直到閱讀官方的這篇文章,才稍解一些疑惑。
並稍作記錄如下。
本文出處為TypeScript for Java/C# Programmers
我不會逐字翻譯,只針對我認為重要的觀念作筆記。
在 C#/Java Class 是程式的基本單位,這類的程式語言我們稱之為 mandatory OOP
而在 TypeScript/JavaScript 當中 Function 才是程式語言的基本單位。
Function 可以自由的存在,而不需要寄生在 Class 之中。
這帶來了靈活性的優點,在思考 TypeScript 時,應以此作為考量。
因此,C#和 Java 的某些結構,如 Singleton 和 Static Class 在 TypeScript 中是不必要的。
Nominal Reified Type Systems vs Structural System
C#/Java 使用 Nominal Reified Type Systems ,
這表示 C#/Java 程式中所使用的值或物件,一定會是 null 或基本型別(int、string、boolean 等…)或具體的 Class。
而在 TypeScript 中,類別只是個集合。
你可以這樣描述一個值同時可能是 string 或 number
1 | let stringNumber: string | number; |
同時在作型別的推導的時候, C#/Java 會有具體的型別,而 TypeScript 會使用結構作推導,
參考下面的例子,我們沒有給 obj 具體的型別,但是在結構上符合 Pointlike 與 Named 所擁有的屬性,
使得呼叫方法時的型別推導在 TypeScript 是合法的。
1 | interface Pointlike { |
這樣的設計在 runtime 的時候,我們無法具體的知道型別是什麼,
下面的概念在 TypeScript 將不可行,
即使用 JavaScript 的 typeof 或 instanceof 你也只會拿到 “object”,而非具體的型別
1 | // C# |
即使如此,這樣的設計在編譯時期的檢查在實務上是足夠的,
另外兩個例子與長時間開發 C#/Java 的概念上可能會有所不同,
Typescript 允許設計無屬性的 Type,而基於 Structural System
你可以建立一個方法傳遞任何物件進去(而不是用 any 或 object 去定義傳入值)
1 | class Empty {} |
下面的程式不會發生錯誤,但是可能會讓 C#/Java 的開發者有點意外
1 | class Car { |
一樣基於 Structural System 的設計,有相同的屬性與方法簽章的兩個不同物件,
是允許這樣子的行為,而以官方的看法來說,實務上並不太容易發生這種情形(兩個不同的模型,卻有相同的方法、屬性等…)。
以下是 C#/Java 與 TypeScript 的相同和不同之處:
相同之處:
不同之處:
If it looks like a duck, swims like a duck, and quacks like a duck, then it probably is a duck.
TypeScript 的類型設計讓我想起了鴨子測試,也讓我想起 golang 對 interface 的處理方式。
甚至想起一些對物種起源的探討,先有分類還是先有特性呢 ? 真實的世界分類反而是人類主觀強加上去的。
TypeScript 這樣的設計似乎比起強制性的類別設計(C#/Java),更貼近真實的世界。
(fin)
QA 環境的 GCP Cloud SQL 沒有開 public IP。
不開 public IP 有兩個好處:資安性提高、省錢(GCP 的 public IP 要額外收費)。
但這樣一來要怎麼從本機連到資料庫?研究了一下,有三個方向。
GCP 官方工具,在本機起一個 proxy process,讓應用程式連 127.0.0.1 即可。
優點:不需要 VPN 或 SSH,安全性高,官方維護。
缺點:需要安裝設定,而且有個陷阱——
只有 private IP 的 instance,啟動時必須加 --private-ip flag:
1 | ./cloud-sql-proxy --private-ip INSTANCE_CONNECTION_NAME |
沒加這個 flag 的話,預設會嘗試用 public IP 連,然後噴這個錯誤:
1 | Failed to connect to instance: Config error: instance does not have IP of type "PUBLIC" |
另外,Auth Proxy 的機器本身必須在同一個 VPC 內才能透過 private IP 連到 Cloud SQL。
在 GCP 上建立 Cloud VPN,讓本機透過 VPN 加入 VPC 網路,直接連 private IP。
優點:連線後就像在同一個內網,所有服務都能存取。
缺點:設定成本高,需要維護 VPN gateway,適合團隊長期使用,對單一 QA 環境來說有點殺雞用牛刀。
透過一台在 VPC 內的 VM(跳板機)建立 SSH tunnel,把本機的 port 轉到 Cloud SQL 的 private IP。
優點:不需要在 GCP 上另外設定網路,只要有一台跳板機就好。
缺點:需要管理 SSH key,每個開發者都要自己設定,高流量下有效能瓶頸。
我選了 SSH Tunnel,用 DataGrip 設定最方便。
步驟一:開 DataGrip → 左上角「+」→「Data Source」→ 選 MySQL(或你的 DB 類型)。
步驟二:填寫 DB 連線資訊。Host 填 Cloud SQL 的 private IP,Port、User、Password 照填。
步驟三:切到「SSH/SSL」頁籤 → 勾選「Use SSH tunnel」→ 點「Add SSH configuration」:
注意:這裡填的 Host 是跳板機,不是 Cloud SQL。
步驟四:按「Test Connection」確認連線成功,儲存設定。
三個方案各有適用場景:
--private-ip(fin)
在開發 Node.js 應用程式時,我們可能需要在不同的 Node.js 版本之間進行切換。
在這種情況下,一個方便的解決方法是使用 Node Version Manager(nvm)。
而 Homebrew 則是一個流行的 macOS 套件管理工具。
在這篇文章中,我們將探討為什麼官方不建議使用 homebrew 安裝 nvm。
首先,值得注意的是,nvm 官方文件明確表示不建議使用 Homebrew 安裝 nvm。
主要是因為 Homebrew 的安裝方式可能會干擾 nvm 的運作,導致一些奇怪的問題。
nvm 官方建議使用其提供的安裝方式,以確保 nvm 能夠正常運作。
那麼,標準的 nvm 安裝方式是什麼呢?
您可以在 nvm 的 GitHub 頁面上找到完整的安裝指南,這裡不再贅述。
簡而言之,您需要在終端機中運行一個安裝腳本,該腳本將安裝 nvm,並更新您的 shell 啟動腳本以使其能夠正常運行。
如果您仍然希望使用 Homebrew 安裝 nvm,可以參考一些額外的資源。
這裡有一篇詳細的文章,介紹了如何使用 Homebrew 安裝並配置 nvm。
不過,需要注意的是,這種方法仍然不是官方建議的方式。
不管您選擇哪種方式安裝 nvm,一旦完成後,您需要在終端機中設置 nvm 的環境變數才能正常運行。
如果您希望在不關閉終端機窗口的情況下讓變數生效,可以使用以下命令:
1 | source ~/.bashrc |
如果您使用的是 zsh,則需要使用以下命令:
1 | source ~/.zshrc |
這將重新載入您的 shell 啟動檔案,使 nvm 環境變數生效。
參考:
(fin)
在 macOS Monterey 上如何處理開發伺服器使用端口被佔用的問題,
若使用其他 macOS 版本,請查看相關頁面。
更新到最新的 macOS 作業系統時,發現我的前端網站,
顯示類似於「Port 5000 already in use」的訊息。
透過執行
1 | lsof -i :5000 |
發現正在佔用該端口的進程名稱為 ControlCenter,這是一個原生的 macOS 應用程式。
即使你使用強制終止它,它還是會自動重新啟動。
原來使用該端口的進程是 AirPlay 伺服器,
你可以在「系統偏好設定」 >「共享」中取消勾選「AirPlay Receiver」以釋放 5000 端口。
網路大多的中文解法是關閉”隔空播放接收器”,在新版的 OS 找不到,可能是語言差異。
所幸找到英文的解法,順利停止佔用 port 的服務。
(fin)