前言
請參考前篇,我們將建立兩台 VM,
一台作為 CI/CD 用的 Gitlab Runner,另一台作為 Web Server,
本篇將介紹 Web Server 的相關設定,
架構如下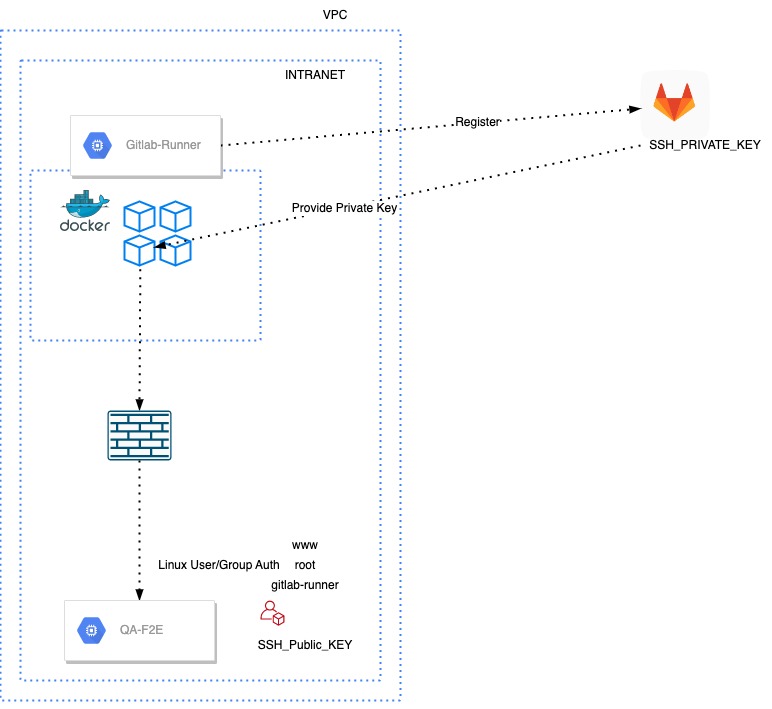
建立 VM
建立 GCP VM 步驟如下:
- 登入 GCP 控制台並選擇適合的專案。
- 在主選單中選擇「Compute Engine」,進入虛擬機器的管理頁面。
- 點選「建立」(Create) 按鈕,開始建立新的虛擬機器。
- 選擇適合的地區 (Region) 與區域 (Zone),這會決定虛擬機器的物理位置與可用性。
- 選擇適合的機器類型 (Machine type) 與規模 (Instance size),這會決定虛擬機器的運算能力與資源配置。
- 選擇適合的作業系統映像 (Operating System Image),這會作為虛擬機器的基本作業系統。基本上我都選 Ubantu
- 選擇適合的開機磁碟 (Boot disk) 配置與容量,這會作為虛擬機器的主要儲存空間。
- 選擇適合的防火牆設定 (Firewall) 與網路 (Network) 設定,這會決定虛擬機器的網路連線與安全性設定。
- 完成其他選項設定,例如使用者資料 (User data)、預設密鑰 (SSH Keys)、啟用擴展 (Enable extensibility) 等。
- 檢閱與確認虛擬機器的設定,並按下「建立」(Create) 按鈕,開始建立虛擬機器。
- 等待 GCP 完成虛擬機器的建立與啟動。
- 成功建立虛擬機器後,可以透過 SSH 連線或其他遠端連線方式進入虛擬機器,並進行相關的設定與應用程式部署。
Web Server
Web Server 我們建置得很簡單,
使用 Vue 建立的靜態網站,並且由 Nginx 來 host 它
- 安裝 Nginx
1 | sudo apt update |
設定 Nginx:預設的 Nginx 設定檔通常位於 /etc/nginx/nginx.conf.。
可以編輯此設定檔,設定 Nginx 如何處理 Vue 的靜態檔案。
以下是一個範例設定檔:
1 | server { |
在建立測試環境的 Web Server 時,需設定 public IP 以對外提供服務,
但同時需要建立防火牆以保障安全性。其他如 DNS、憑證、防火牆等設定,之後再補充。
建立 Vue 專案
將 Vue 應用程式編譯成靜態檔案:在 Vue 應用程式的專案目錄中,可以使用以下命令編譯 Vue 應用程式成靜態檔案:
1 | npm run generate |
編譯完成後,靜態檔案會生成在 ./output 目錄下。
將編譯完成的靜態檔案放置到 Nginx 的目錄,
重新啟動 Nginx 即完成部署,如果有設定 Hot Reload 則不需要重新啟動
現在可以透過瀏覽器來測試 Vue 的靜態網站是否正常運作。
Tips
重啟 nginx
1 | systemctl restart nginx |
Nginx hot reload
1 | nginx -s start |
參考
- GCP-Compute Engine
- Certbot-get your site on Lock https://
- [實作筆記] Gitlab CI/CD 與 GCP 相關文章
- Vue.js
(fin)