課程簡介
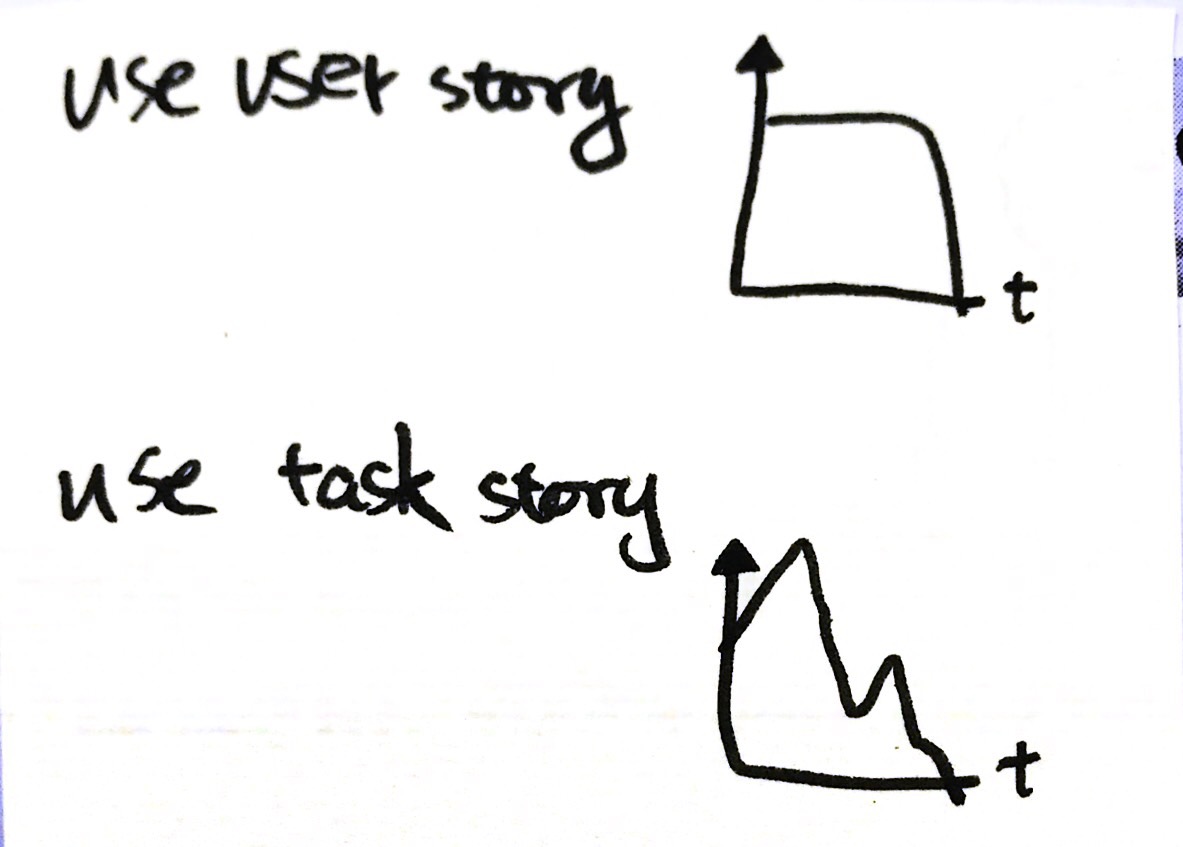
Daily Scrum
- 建議 Time Box 15 mins,每日同時同地進行,注意避免超時。
- 目的是 Adapt,觀注 Item 而非 Task。
- Scrum Master 不是會議的中心;避免讓團隊成員變成對 Scrum Master 或 PO 報告。
- Scrum Master 應減少(避免成為中心)
- PO 不一定需要每天參與 Daily Scrum,但參與有助於問題的釐清
- 不討論細節,只確認現況(Reality Check)與目標(Goal)的差距,細節可會後釐清
補充
- GROW
- 有的人就是很話澇,曾有團隊給每個成員紅/黃牌,當有人說得太久就給牌警告 XDDD
- Scrum Master 可以作的事
- Does the team find the daily scrum useful ? 成員有沒有發現站立的好處 ?
- Do they manage themselves ? 團隊是否自組織了?
- Do they share their work ? 他們的工作是共享的嗎 ?
- Do they come prepared ? 他們(這個 Sprint/Item/Task)準備好了嗎 ?
- Do they report unclear ?他們的說明是否易懂?
- Does it take too long ?是不是太耗時了?
我在 C 社是下午 5:30 執行 Daily Scrum,在 N 社是早上 10:30。
個人比較喜歡 C 社的作法,但有可能是被制約了,因為那是我第一個跑 Scrum 的團隊。
主觀的比較一下優缺點
|
優點 |
缺點 |
| 下午執行的 |
站立完就可以下班了。 |
站立講不清楚就會拖到下班,人性會選擇甘脆不講。 |
|
一早來就可以根據昨天的站立進行開發。 |
第二天一來忘了昨天說什麼了啦 |
| 上午執行的 |
站完就可以開始一天的工作。 |
10:30 站立就會有人 10:30 才進公司,提早來反而沒人問(但是安靜) |
|
剛站完比較不會忘 |
如果有會後討論,一不小心就中午了呢(一 ω 一) |
Sprint Review & Retrospective
Review
- 展示我們完成了「什麼(What)」(面對 Stakeholder 練習別說技術語言)
- 建立 Product Owner 與 Stakeholder 的信任
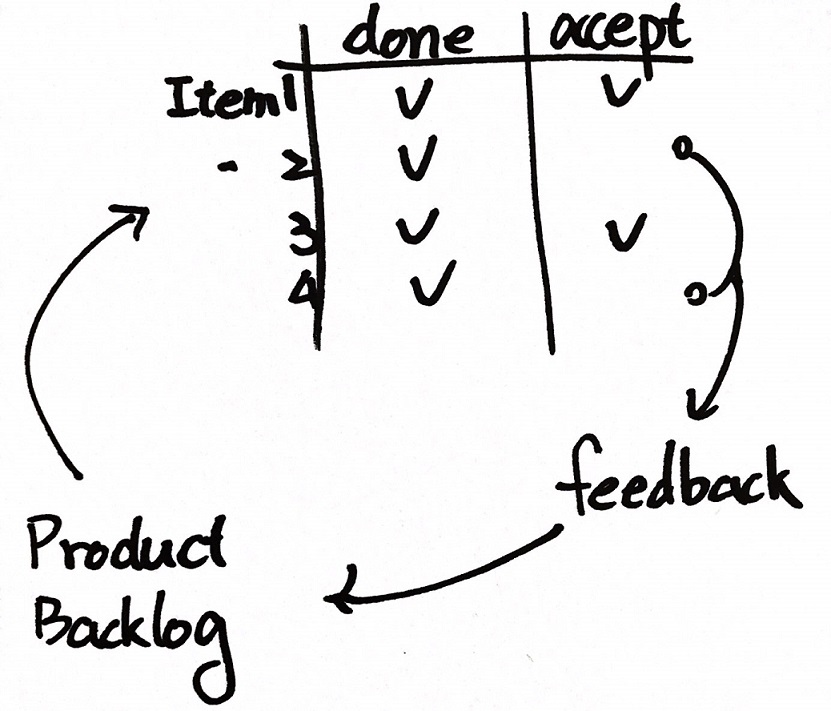
- 取得來自 Product Owner 與 Stakeholder 的 Feedback
- 圍繞著 Product 進行 Inspect 與 Adapt
- Team Member 完成某些 Task 或 Item 之時,就可以找 PO 進行 View (Just In Time Review)
Retrospective
- 觀注我們是「怎麼(How)」作的
- 圍繞著 Process 進行 Inspect 與 Adapt
- 從經驗中學習,增進溝通
- 幫助團隊關注改善 Process
- 關注重複發生的問題
「每個人的觀點都是對的;但不完全是對的。」
上面這句話,要兩句同時看才完整。
回饋
盲人摸象的啟示,沒有人錯;但組合起來就不是大象。
不論那隻大象是你的團隊、組織、公司或是這個社會。
專案開始之初,首重看見全貌。看見全貌之後,確認自己在哪裡! — Ruddy Lee(李智樺) N 社敏捷教練
幸福的秘密,就是去欣賞世界上所有的奇特景觀,但不要忘記了湯匙裡的油。 — 牧羊少年奇幻之旅
Product Owner & Product Blog & Refinement
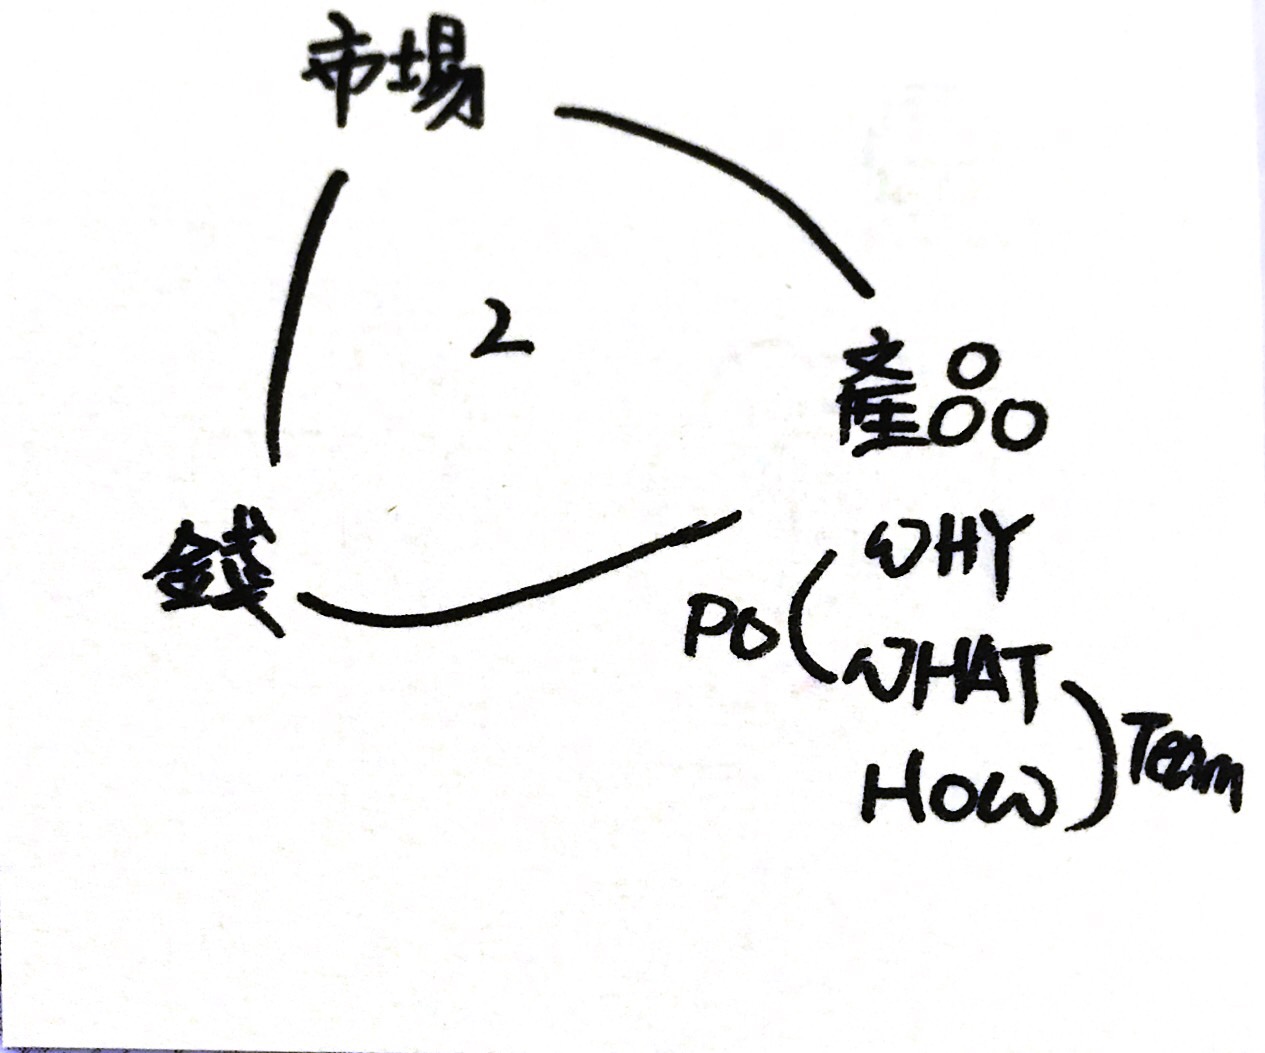
Product Owner
- 對產品有遠景
- 定義產品的功能,決定發佈的日期與內容
- 對功能作排序(價值、成本、風險…etc)
- 對產品獲利能力負責
為什麼 Scrum 的設計上只有一個 PO ,這讓下決定變得簡單;但實務上這件事不容易。
在 C 社期間與 Boss 的距離較短(公司規模小), 但是 Boss 也是喜歡透過一個 PM 來作代理人,在 N 社公司規模更大,PMO 基本上是個巨型團隊,即使是 PO 仍需要與其它部門確認、核可、討論才能決定。不論大小,在工作實務上仍然像個 PM 或是窗口與代理人。
Product Backlog
- 要包含功能性與技術性的需求 Items
- Items 將被拆解為工作項目(Tasks)
- 只對高優先的項目作細部分解。
- 多個團隊應該共用一份 Product Backlog
- 由商業計劃驅動,有時候你需要客戶的協助
好的 Product Backlog ,可以協助團隊 Refinement
- Ordered
- Detailed Appropriately
- Dynamic
- Estimated
Refinement
- 最高優先的 Item 可以提前 2-3 個 Sprint 執行 Refinement
- PO 與 Team 一起進行
- 你可以在 Sprint 中期進行一次
- 可以透過 User Story Mapping 進行討論
User Story 的目的是用來達溝通的,
溝通最大的目的在於分享觀點與學習,不要僅僅流於形式。
實務上 Refinement 隨時會發生,關鍵的成員討論並決策。
而且不難實現,隨時 Refinement 是第一線的開發人員很自然的思維與生態。
PO 在場的話更好,但是不是必要的。特別要記得設定 Time Box,避免討論多與實踐。
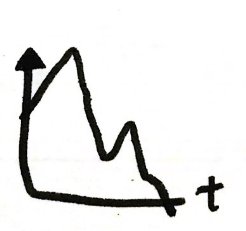
Walking Skeleton
這裡有關一些 User Story Mapping 的東西,我不清楚故不作說明,未來再作補充。
我們可以把 Y 軸的分群當作一個一個 Feature,很明顯我們不需要把每件事作到 100% ,那樣太慢而且沒有意義。
我們應該先完成 X 軸最上方一列的 Items ,要儘可能的簡單,
完成一個完整可動的骨架。
它的圖形會如下;
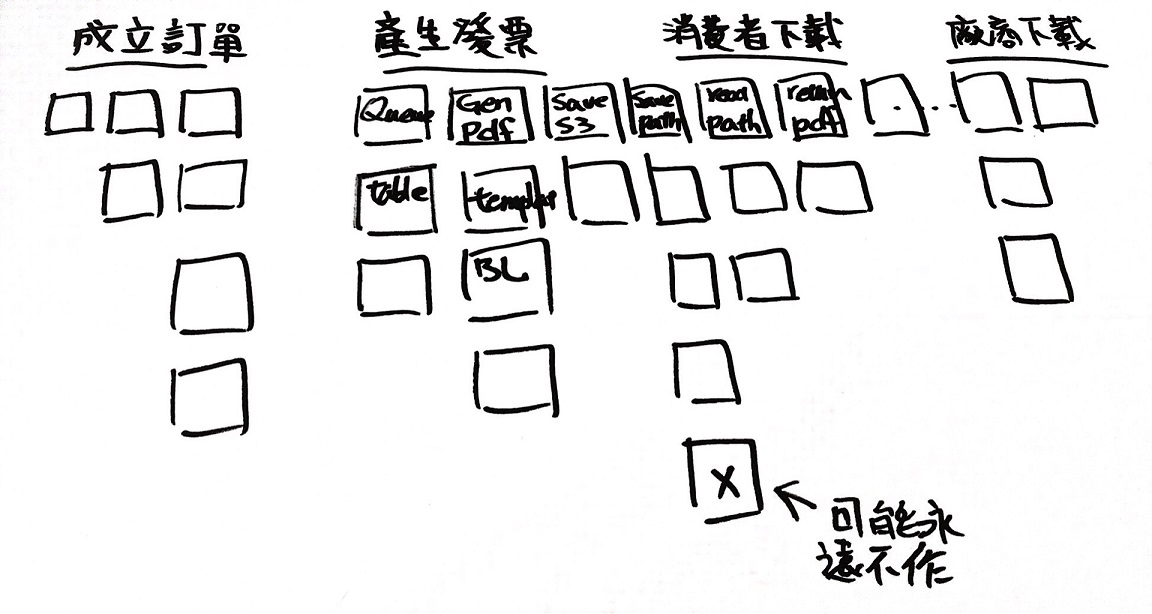
它不代表要被交付,它只完成了一個最簡單的閉環,能提供最基本的回饋(不需來自真正的客戶)。
當完成了 Walking Skeleton ,在這個基礎上我們可以填加其它的增量,應該在前 1~2 Sprint 就完成它。
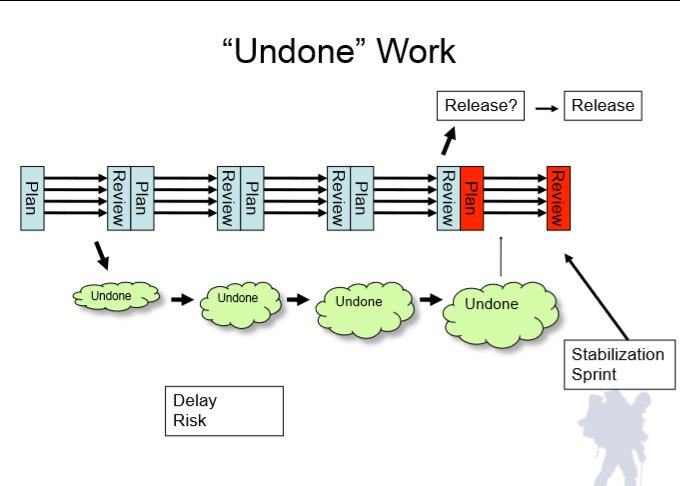
Scrum Master 應該與 PO 一起找到 Walking Skeleton,在一個 Release 前 1/3 的時間就應該完成 Walking Skeleton。未必要 Release 它,因為它很可能是相當粗糙的,但是儘早完成可以幫助團隊降低風險,而且完成後 Value 的選擇將可視化,同時也完成了基本的 Architecture 。
當然所有部份都不完整,但是可以隨著時間逐漸完成。有些項目我們可能永遠不會作,因為不符成本。另外如果一個完整的 Walking Skeleton 無法在一個 Sprint 裡完成,請選擇 Risk 高的優先作。
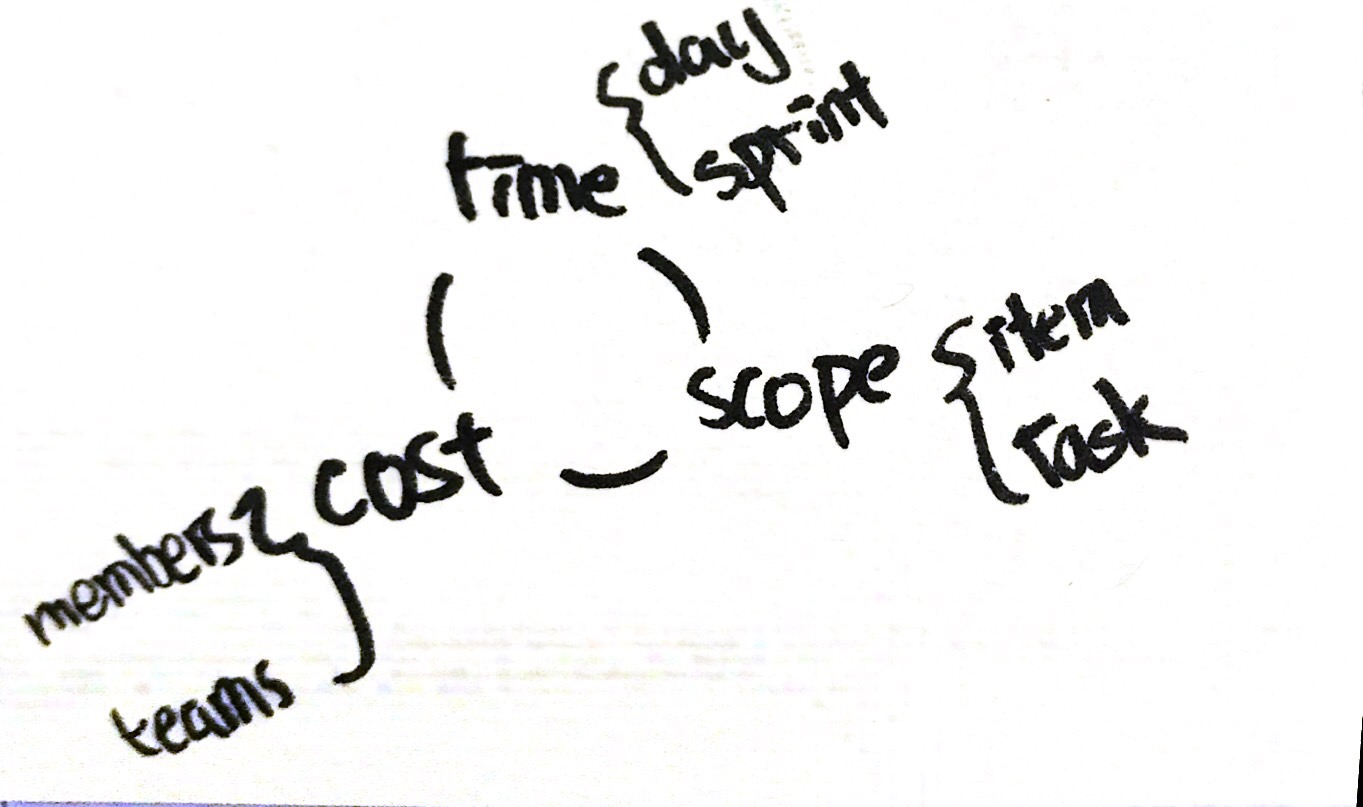
估時
對每個 Item 估點數,請參考 Planning 的部份;但是點數對客戶與老闆其實沒有辦法理解,最重要轉換成時間。關鍵還是 Velocity ,這是團隊的戰鬥力,假設總共的點數估計為 50 點,團隊每個 Sprint 可以完成 10 點,團隊就需要 5 個 Sprint,以一個 Sprint 2 周來算,這樣就可以向客戶或老闆承諾 10 周的時間。
這裡的例子有點不懂,正常的 Scrum 估時只會專注在一個 Sprint,而 Product Back Log 如果沒有被估點的話,如何換算成點數?更如何向客戶或老闆提供這樣的數據?
估時很適用 Fibonacci 數列,F: 1、2、3、5 、8、13、21、…,很多的工具都有提供,主要以相對大小來比較對一件事情的看法。此外,不要因此被工具限制住了,比如說團隊無法在 8 跟 13 之間,就選擇個中間值吧,「?」也是一張重要的牌,這代表未知、混沌與風險。可以在所有的 Item 中挑選一個的當作基礎,每比較完一個項目,也再次作為比較基礎。「40」、「100」這樣的大牌也有其意義,這意味著 Item 過大,可以再作分解。
較成熟的團隊,也可以拿過去曾經估計過的 Items 作為一組「Reference Pool」,通常不需要估到很精準。
這樣的估計方法,需求的 Items 類型是不是需要很穩定 ?舉例來說,我們的產品如果包含 App、Web 與 Desktop ,團隊成員的 Skill Set 又很小,某些類型的工作只能由少數人開發,隨著 Sprint 有時候需要作 App、有時候需要作 Web;有時候兩者都需要作,這樣的估時算穩定嗎 ?
這是不是表示說 Scrum Team 所需要的團隊組成其實很高?又或是我需要將產品拆成 App、Web 不過這樣不就又回到 Component Team 了 ?那在導入 Scrum 的初期,人員的挑選要找通材,或是學習能力極強的人?
Splitting
The perfect is the enemy of the good
Task 也可以應用 Walking Skeleton 的方式切割,儘早讓整合測試發生,不用一步到位。如果有外部相依,可以考慮先用 Stubbing 的方式隔開,這可能會讓「整合測試」不完整 。
用 Walking Skeleton 的方式開發,QA 會反映沒有什麼好測試的,Sprint 的初期 QA 都在寫測項,等待 RD 完成開發,最後幾天拼命測試。如果先開發 Walking Skeleton QA 會反應這樣的測試並不完整?而 PO 會反應這樣的東西沒有商業價值。
開始第一個 Sprint
- 組成團隊(PO、SM、Team),這會挑戰目前的組織架構,這是難的地方。
- 創建最初的 Product Backlog
- 決定 Sprint 長短
- Define Value & DoD
參考
(fin)